Thursday, July 7, 2016

Summer of Creative Chemistry

I can't believe how completely neglected this blog has been. :-(  It's not that I haven't been creative, I have.  I have gotten rather skittish about posting pictures of my daughter on the internet.  The overwhelming majority of my scrapbooking has her as the focal point, so nothing has been posted.

Bringing me back to the blog-a-sphere, is none other than Tim Holtz!!  If you've every been lucky enough to meet him, you know that he is the most down to earth likeable guy you ever want to meet.  If you've ever been lucky enough to take a class with him, then you know he gives you basic knowledge and truly encourages you to find your own path and experiment.  Personally, I was lucky enough to meet Tim, (and Mario - let's not forget Mario) Summer 2014 at my LSS, and take a class.


If you haven't been lucky enough to meet Tim or take a class with Tim, then you should march right over to Online Card Classes and sign up for Summer of Creative Chemistry!!!  Even if you have met Tim and taken a class with Tim, you should march right on over and sign up because the content is AH-MAH-ZING!! 

It's already Week 5 of Summer of Creative Chemistry, and while I've been following along on the weekends (due to my absolutely crazy work schedule), I haven't been able to create anything just for the weekly challenge  - until now.

The Week 5 challenge is to create a tag, card, or other project using three of more colors of distress paint, using any three (or more) Distress Paint colors and any technique from class.

Using Tim's Colored Crackle technique, I created the following tag using Barn Door, Mustard Seed, Mowed Lawn, and Broken China Distress Paint.


Each chipboard butterfly is painted using exactly the same colors of Distress Paint - the difference is the Crackle Paint.  The top butterfly has Black Soot Distress Crackle Paint, the middle has Picket Fence Distress Crackle Paint, and the bottom has Rock Candy Distress Crackle Paint.  Only the Rock Candy is current in the distress line of products from Ranger, but I had purchased the 3 colors together, so I used them all.  The tag itself has Broken China Distress Stain as a background, with Ground Espresso Distress Ink on the edges.  I flicked water on the background to add interest.  Hope you like it!!

 
.· ´¨¨)) -:¦:-
¸.·´ .·´¨¨))
((¸¸.·´ ..·´ -:¦:-
-:¦:- ((¸¸.· (¨`v´¨)
                  `v´ Darlene


Thursday, November 7, 2013

Core'dinations Hard Core Crop - 2013

It's been a long time since I spent significant time crafting.  The last handful of cards I made were occasion specific and done at the moment they were needed.  Unfortunately, the only reason I've had this much time is because I've been home sick (and instead of sleeping, I've been doing this).
 
Vivian Keh's challenge is to create a gratitude themed card or layout using an autumn palette.  Found here.   This is the card I created for her challenge.


I started using my three of my favorite stamp sets - Changing Seasons from Stampin' Up, 4 Seasons Definitions from Purple Onion, and the frame stamp from Just For Fun.  I selected the autumn scene and the autumn definition and stamped the images into the frame using the mask that goes with the frame stamp.  I hand colored the image using a paintbrush and distress inks.  I used Vintage Photo, Walnut Stain, Ripe Persimmon, Rusty Hinge, Forest Moss, Barn Door, Crushed Olive and Broken China (bird).  The background is inked using Weathered Wood.  I just love that color to create the feeling of a chill in the air!

Using Core'dinations Core Essentials in Butterscotch, I used a Cuttlebug embossing folder and embossed the edge of the cardstock.  I sanded to reveal the core and give true definition to the embossing.  I tied the ribbon on, then mounted it to a card base.  The colors in the photo are a bit off, because the ribbon is a true compliment to the Weathered Wood distress ink.


.· ´¨¨)) -:¦:-
¸.·´ .·´¨¨))
((¸¸.·´ ..·´ -:¦:-
-:¦:- ((¸¸.· (¨`v´¨)
                `v´ Darlene

Core'dinations Hard Core Crop 2013 -

In my excitement to participate, I totally forgot about the blinkie!!!!!  Silly me!  I have of course now added it.

But speaking of being silly - part of creativity is giving things a try to see if they will work.  As the saying goes - there are no mistakes in crafting, only opportunities to embellish!

Let me say, I originally had no intention of participating in Margie Higuchi's Banner Challenge.   Found Here.   It just doesn't fit in with my normal holiday decor.  I then considered a banner for the front door, but I'm sure there is some rule against it in the complex I live in.  Then I decided to think about ways a banner could be used other than home decor - like on a scrapbook layout, or a card or something.  And viola!

Now, she never said how big the banner had to be.  She only said "shaped, holiday banner."  So, starting from the bottom -the card base is made from kraft cardstock from my stash.  On top of that is Core'dinations Black Magic collection, run through my Cuttlebug with M-bossibilities from Spellbinders.  Of course, sanded to reveal the core.  The grass is also from my stash, using random green cardstock that is inked.  I'm sure you're wondering why (or how) I have grass in my stash.  Back before I had my own Cuttlebug, and my own Cricut, and my own Cameo -whenever I went to a crop I would die cut stuff I thought I would use in the future.  This is the last piece of grass I had.  I cut it in half, inked the edges and mounted with foam tape.  The kids on the top of the brick wall are from Stampin' Up Kids at Play stamp set.  They were stamped, colored with pencils, fussy cut, and mounted with foam tape.

For the banner, I used the two smallest dies I own.  The green piece, cut from Napa Valley Core'dinations is the smallest die from Spellbinders Labels 4, the white snowflake is also from Spellbinders.  I stamped the letter for the word "Noel" using Studio G mini alphabet stamps, using Festive Berries and Fired Brick distress ink.


.· ´¨¨)) -:¦:-
¸.·´ .·´¨¨))
((¸¸.·´ ..·´ -:¦:-
-:¦:- ((¸¸.· (¨`v´¨)
                `v´ Darlene

Core'dinations Hard Core Crop 2013 -

I recently had occasion to speak with my daughter's art teacher.  During the course of the conversation she said to me "oh, so you're artistic as well" and my reply was that I don't consider myself artistic at all.  I've been reflecting on that now for a few weeks.  The Hard Core crop has given me the opportunity to find the little girl who loved art class and paint and glue and <gasp> glitter!!!!  The adult me avoids the use of glitter almost always.  A Stickles hoarder I am not. 

This is another either or card - either Tami Mayberry or Clare Buswell.  I ultimately decided to enter THIS card on Clare Buswell's challenge - so this one is for Tami Mayberry's challenge.  Found here.

I again started with the Whitewash Collection - this time choosing Barn Siding.  The embossing folder is from Darice.  I sanded down the image to reveal the core.  The sentiment is part of the same Hero Arts set I've been using throughout these challenges.  I thought it was perfect for the image!  I tried stamping in Fired Brick distress ink, but the image wasn't clear, so I grabbed some red embossing powder to define the sentiment.

For the max two embellishments I used Stickles and embossing powder.

The Stickles are not well defined in the photo, but they fill the tops of Santa's shoes.  The "snow" on the chimney is double embossed.  First I spread white embossing powder and added heat, while it was still wet I added translucent embossing powder for shimmer and heated it a second time.


.· ´¨¨)) -:¦:-
¸.·´ .·´¨¨))
((¸¸.·´ ..·´ -:¦:-
-:¦:- ((¸¸.· (¨`v´¨)
                `v´ Darlene


Tuesday, November 5, 2013

Core'dinations Hard Core Crop 2013 -

Now, for what may or may not be my last entry for this year's event.  This is for Kerri Smith's Creating With Tags challenge.  Found here.  Her only requirement was to make a holiday tag.  Now, I confess, when I made this tag I made it with the intent to enter it in Kate Nolan's tag challenge, and I made the turkey tag that I entered in that challenge, for this challenge.

I flipped them because Kate's challenge says  "Feel free to make just the two tags, but don't feel as though that is all you can do.  You can also incorporate them into a layout or a card or an altered project. Let your imagination soar with this challenge!"  After reading that I took the turkey tag and made it into a placeholder for the dinner table.

This is a quick and easy tag.

The cardstock is either Black Iris or Navy Core'dinations - I'm not sure which.  I had a piece leftover that was the perfect size to make a tag.  It had the little strip at the bottom which let me know it was Core'dinations, but the label with the name was not there.  I compared it to full sheets I have in my stash, and it could be either.

In any event - I embossed using a holiday Cuttlebug folder that was a special purchase item I got years ago, sanded to reveal the core.  I stamped the Hero Arts sentiment using Brilliance Moonlight Ink, and embossed with white.  Easy peasy!


.· ´¨¨)) -:¦:-
¸.·´ .·´¨¨))
((¸¸.·´ ..·´ -:¦:-
-:¦:- ((¸¸.· (¨`v´¨)
                `v´ Darlene

Core'dinations Hard Core Crop 2013 -

So many of the challenges have the potential to overlap, but one of the rules is that you cannot submit one project for two challenges.  So, this card could be for Tami Mayberry's CAS Holiday Card challenge OR Clare Buswell's Quick and Easy Christmas Card challenge.  I can't decide!!!


This is an A2 card.  I used Core'dinations Whitewash collection.  This is a Cuttlebug embossing folder that was part of a special purchase that I got several years ago.  After embossing, I sanded the images to reveal the black core.  I used Holly stickles on the bows, and StarDust stickles inside the ornaments to offset the black.  The sentiment is from Hero Arts.


.· ´¨¨)) -:¦:-
¸.·´ .·´¨¨))
((¸¸.·´ ..·´ -:¦:-
-:¦:- ((¸¸.· (¨`v´¨)
                `v´ Darlene

PS.  I ultimately entered this in Clare Buswell's challenge found here.

Core'dinations Hard Core Crop 2013 -

Continuing on with the challenges.  I decided to try Ellen Sosnoski's Handmade Elements challenge.  Found here.  As the title suggests, her challenge required all participants to create their own handmade element on a project, and of course, use Core'dinations cardstock.  I decided to create a card.

I used Spellbinders ovals to create the frame, and embossed with Swiss Dots.  I shaded the background with Weathered Wood and Tumbled Glass distress ink.  The deer is a stamp from a collection I got last year.  I have misplaced the card, so I can't offer the name of the stamp.  I stamped in Versamark and embossed with silver embossing powder, then fussy cut it and adhered.

The trees are my handmade element for the challenge.  I cut three different sized circles using Spellbinders Standard Circles Small, and Scalloped circles from Core'dinations Distress Collection in Peeled Paint.  I then embossed each circle using a Tim Holtz embossing folder.  I sanded to reveal the core.  I cut each circle in half, then made a cone from each half circle.  Starting with the largest cone, I stacked two smaller cones on top, then flattened them, adhered them closed with mini glue dots.  I then attached them to the card front.

The sentiment is from Hero Arts.


.· ´¨¨)) -:¦:-
¸.·´ .·´¨¨))
((¸¸.·´ ..·´ -:¦:-
-:¦:- ((¸¸.· (¨`v´¨)
                `v´ Darlene


Ellen Sosnoski’s  Handmade Element Card Challenge

Core'dinations Hard Core Crop 2013 -

Core'dinations is hosting its annual Hard Core Crop.  From November 1-3, various designers have posted challenges.  I am not participating in all of them.  First up though is Kate Nolan-Denham's Stamped Tags Challenge.  Found here.  As with all challenges, you must use Core'dinations cardstock on your project.  This particular challenge was to make two tags, and stamp on the tag.


The tag on the left is made with Napa Valley Core'dinations as its foundation.  The stamped image is from Stampers Anonymous.  The butterfly is Spellbinders Les Papillions cut from Core'dinations Tiger's Eye from the Gemstone Collection.

The tag on the right uses Core'dinations Foundations Walnut as the tag base.  The turkey is cut from Create a Critter Cricut cartridge.  The feathers are cut from Core'dinations Distress Collection in Antique Linen, and embossed with Swiss Dots, the hat from Napa Valley.  The edges are distressed with Rusty Hinge.  The turkey body is inked with Walnut Stain distress ink. I stamped the turkey face using Peachy Keen Critter Faces stamp set.  I mounted the tag on a scrap piece of kraft cardstock, stamped a name, and plan to finish the set for placemarkers for Thanksgiving dinner.


.· ´¨¨)) -:¦:-
¸.·´ .·´¨¨))
((¸¸.·´ ..·´ -:¦:-
-:¦:- ((¸¸.· (¨`v´¨)
                `v´ Darlene


Kate Nolan-Denham  Stamped tags Challenge

The Strange Sea Monster of Strawberry Lake . . .

Contains a line that states as follows: "That's one of the troubles with a lie.  You've got to keep adding to it to make it believable to people."  (Credit: "The Mad Scientists' Club by Bertrand R. Brinley).  And so too, is a blog - you have to keep adding to it.  Something, I sadly have not done.

My partner in this endeavor unfortunately has significant back issues, and has been unable to do anything crafty for more than a year, so I should rename the blog The Scrappin' Lawyer, but have not.

From no posts, to an overload of posts I shall go.


.· ´¨¨)) -:¦:-
¸.·´ .·´¨¨))
((¸¸.·´ ..·´ -:¦:-
-:¦:- ((¸¸.· (¨`v´¨)
                `v´ Darlene

Saturday, March 10, 2012

Calendar Girls March Blog Hop

Welcome to the Calendar Girls March Blog Hop!!

Papercrafts Presents 365 Cards magazine is our inspiration for these monthly hops which  became the Calendar Girls. The magazine has Creative Ideas for every day of the year: occasions, holidays, and celebrations including 42 unique celebratory days!!! These unique days are our inspiration. The March days being featured on this hop are:

  1. March 2: Read Across America Day -
  2. March 4: National Grammar and Punctuation Day
  3. March 12: 100 Years of Girl Scouting
  4. March 14: PI Day
  5. March 17: St. Patricks' Day
  6. March 17: National Quilting Day
  7. March 20: Spring Begins
  8. March 23: Mustache March 


You won't want to miss a single occasion!!!  

The hop starts HERE with Read Across America Day!!!

Read Across America Day just happens to coincide with Dr. Suess' birthday.  Who doesn't love a good Dr. Suess book???  My little girl loves them!  As such, my original plan for this hop was a scrapbook layout featuring my now 4 year old sitting cross legged on the floor "reading" a Dr. Suess book to her stuffed animals.  Unfortunately, I accidentally deleted all the photos on my cell phone, including the aforementioned photo.  Instead I made this plaque which I will give to my daughter's pre-K teacher at the end of the school year.


 I started with an unfinished wood piece purchased at my local AC Moore.  I stained it with Antique Linen Distress Stain.  I used my Cuttin' Up cricut cartridge for the letters at 2 1/2 inches, and A Child's Year for the focal image at 4 inches.  I used Oh My Crafts vinyl for it all.  I wanted to put books on each corner, but have thus far been unhappy with the results of all book images that I have tried so far, so I've left it plain.

"Today you are you, that is truer than true.  There is no one alive who is YOUer than you!."  Dr. Suess


The full line-up for March is:

Darlene: http://twoscrappinlawyers.blogspot.com/   << YOU ARE HERE
Laura: http://lauraleesdream.blogspot.com/
Lynne: http://slasewcraftiness.blogspot.com/
Lisa: http://mycraftyspaces.blogspot.com/
Zenita: http://www.scrappinwithz.blogspot.com/
Michelle: http://slasewcraftiness.blogspot.com/
Kimberly - http://scrappingrookie.blogspot.com/

Stop by and check out these holidays as I am sure you are going to want to remember these holidays and include them in your card making projects!!!!!  Laura is next 

We will have blog candy to the lucky recipient that remarks on each site along the way!

Thanks for stopping by and mark your calendar again next month to see what Holidays to Celebrate on April 14th for the next Calendar Girls Blog Hop!


.· ´¨¨)) -:¦:-
          
¸.·´ .·´¨¨))
      ((¸¸.·´  ..·´   -:¦:-
     -:¦:-   ((¸¸.·
 (¨`v´¨)
                        `v´
  Darlene


Wednesday, February 29, 2012

A Dose of Tim Holtz Inspiration

Every Tim Holtz fan knows all about his 12 tags of Christmas.  For 2012, he has decided to try something new - the Twelve Tags of 2012.  You can read all about it on Tim's blog here.

This is the tag Tim Holtz created:


This is my take on tag number one (which should be tag number two but isn't, which you know if you followed the link and read Tim's blog post!).

I know I should have cropped the photo, but it's late, and I'm tired and almost forgot to take the picture and post in the first place!!!

As you can see, I didn't use Cupid - mainly because I didn't have a Cupid, or a Cricut cartridge with a Cupid on it.  So I used this delightful image from A Child's Year cartridge instead.  I used Tags, Bags, Boxes and More to make the tag using kraft cardstock.  I grabbed a Cuttlebug embossing folder to dry emboss, then rubbed the raised image with Perfect Medium and added some Forever Red Perfect Pearls.  The "with love" sentiment on the bottom is also a Cuttlebug folder, upon which I used purple Perfect Pearls.  Not having any honeycomb paper, I used my favorite 3D technique to create the heart, added a flower in the center, some ribbon on the top and bottom.  I did ink the edges of the tag, and sand them to give them some character, but the photo doesn't show it.

Hope you like it!


.· ´¨¨)) -:¦:-
          
¸.·´ .·´¨¨))
      ((¸¸.·´  ..·´   -:¦:-
     -:¦:-   ((¸¸.·
 (¨`v´¨)
                        `v´
  Darlene


Saturday, January 21, 2012

An a-ha moment!

Did you ever have one of those ideas that you think is positively brilliant, only to find that someone else has already thought of it?  After spending days working on a project, that is exactly what happened!

I decided to post the photo anyway, since after all, my version is a bit different than that which came with this week's issue of the Cricut Chirp!  So, without further ado, here is my Valentine's Day wreath.


I started with heart shaped styrofoam purchased at Joanne's.  Using the Flower Shoppe Cricut cartridge, I cut Fun 1 in a variety of sizes.  The largest red roses are cut at 5", all the small cream colored one are cut at 2".  I inked the edges of the 5" roses with Fired Brick Distress Ink to give them some more dimension.  I rolled them all with my Hybrid Petal Roller from Imaginesce.  Linky  I used my hot glue gun to close them up.  I attached them to the wreath using straight pins.  I used pearl headed pins for the red roses, and ordinary pins for the cream roses.  I cut a piece of ribbon from my stash to create a hanger, and adhered it with straight pins.


.· ´¨¨)) -:¦:-
          
¸.·´ .·´¨¨))
      ((¸¸.·´  ..·´   -:¦:-
     -:¦:-   ((¸¸.·
 (¨`v´¨)
                        `v´
  Darlene

Friday, December 9, 2011

Hello

to all my bloggy friends.  Another post without a project.  :(

Sorry I have been MIA.  I have just returned from a week long trip to Disney to celebrate my daughter's birthday.  Unfortunately, during my little family vacation my house sprung a leak, causing a flood and extensive damage.  I've been dealing with contractors, and plumbers and insurance people for the last three days.  I have been told my house will not be back together until after Christmas.  I will be spending all free time for the remainder of the month either packing up everything to get it out of the way for the repair work to be done, or unpacking it to get back to living.

I will do my very best to post pictures I have stored on my computer of older projects I have done, but the picture quality will be far from ideal.  In the meanwhile -happy crafting everyone!


.· ´¨¨)) -:¦:-
          
¸.·´ .·´¨¨))
      ((¸¸.·´  ..·´   -:¦:-
     -:¦:-   ((¸¸.·
 (¨`v´¨)
                        `v´
  Darlene

Thursday, December 1, 2011

Today is World AIDS Day


AIDS continues to be a major health concern.  There are new cases of HIV diagnosed every single day in the United States.   Today is a day of remembrance for the lives lost to this disease, and a day to be thankful for the medical advances that allow so many to continue on.  Take a moment today to think of those lost and those who are surviving.

In memory of those clients I have lost over the last decade.  May you all rest in peace.

Thursday, November 24, 2011

Happy Thanksgiving!

Happy Thanksgiving Everyone!!!

Today is my guest designer spot at Susana's Scrapping Corner  found here!

Here theme this month was My Favorite Things.  Due to some camera malfunctioning, I was unable to photograph my project.  :(  But, I went through my stash of photos from past projects and came across a card I made a few months ago for a Baptism.

I used Spellbinders Classic Scalloped Ovals for the deep embossed image around the cross.  The cross itself is from the Indie Art Cricut cartridge, cut in various shades of pink.  I used my Xyron 250 to adhere the cross pieces together, and to the card.

Hope you like it!  Stop by and wish Sue a Happy Thanksgiving!  Until next time!

.· ´¨¨)) -:¦:-
          
¸.·´ .·´¨¨))
      ((¸¸.·´  ..·´   -:¦:-
     -:¦:-   ((¸¸.·
 (¨`v´¨)
                        `v´
  Darlene

Thursday, November 17, 2011

Another Source of Inspiration

EGADS!!!  Almost three weeks since the last post!  I promise to be better!!  Life has been hectic, leaving little time for crafting.  When I do have time to create, I don't always have the time to set up everything to take a decent picture and upload it.

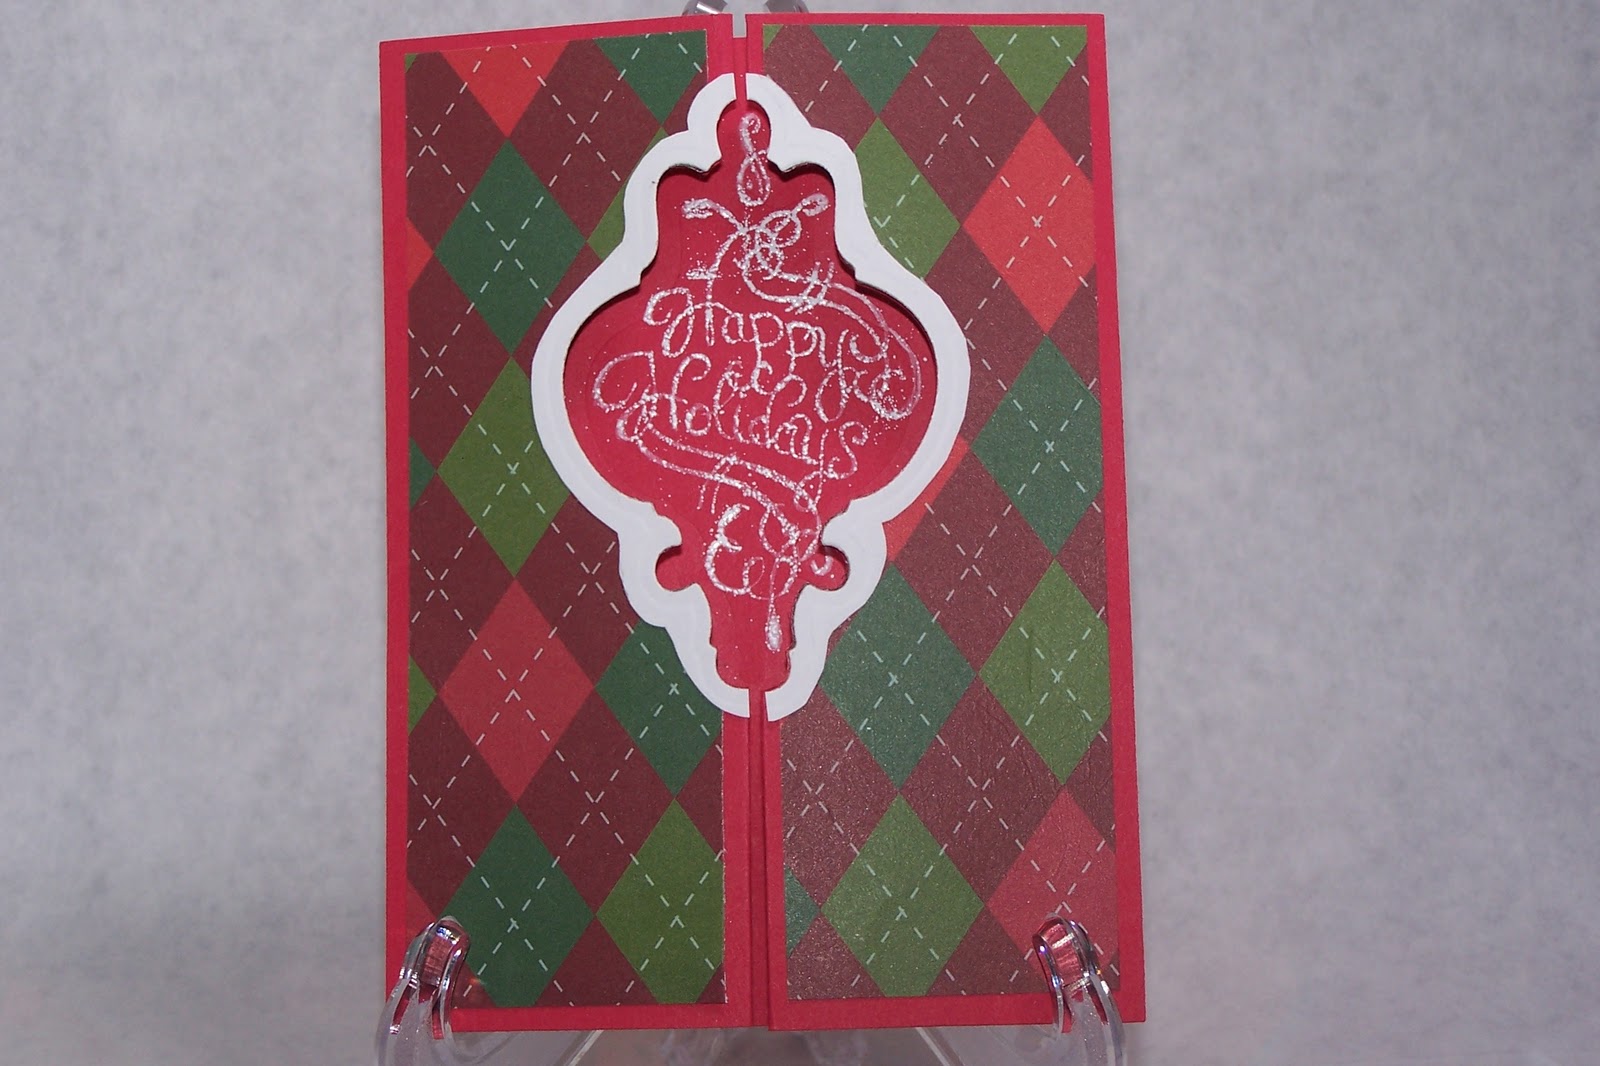
More than a month ago, hopping around the Spellbinders blog, I came across this video YouTube.  When I watched the video I thought it was a really great way to spruce up a gatefold card (which is my absolute favorite fold), but didn't really have the chance to try it myself.  Over the weekend I gave it a whirl, with this as the result:


I started with Recollections basic cardstock in red cut at 5 1/2 by 12.  I eyeballed the patterned paper to make it fit.  I adhered it with my Xyron Mega Runner.  Rather than use the Twisted Metal Tags and Accents die that Julie uses in the video, I chose the large ornament die, from the Holly-Ornament Set from Heartfelt Creations Found Here.  The sentiment is the matching stamp from Heartfelt Creations Winter Wonderland Collection found here.  I stamped it in white pigment ink from Hampton Arts, and embossed with white embossing powder.  I tried as hard as I could to get the ink onto the die to create the lovely frame, but alas, I couldn't get a good image - so I just used ordinary white cardstock.  Rather than use a glue pen, I ran it through my Xyron 250.

Here is a view of the card when it is opened:
I chose not to use the die cut ornament for the inside of the card because I wanted the white embossing.  I was originally very unhappy with the stray flecks of embossing powder, but now I think they look like snow!

I will be submitting this card to Xyron for their holiday card contest.  Until next time!!


.· ´¨¨)) -:¦:-
          
¸.·´ .·´¨¨))
      ((¸¸.·´  ..·´   -:¦:-
     -:¦:-   ((¸¸.·
 (¨`v´¨)
                        `v´
  Darlene
 

Sunday, October 30, 2011

Inspiration

Where do you find yours?

I love to hop through different blogs.  I love to walk around when I'm at a crop and see what other scrappers are creating.  I love to look at Etsy and Ebay to see the different designs.  Sometimes inspiration comes from another place.  For instance . . . one day I was flipping through a copy of Arizona Highways.  For those of you not familiar with the magazine, it is a publication put out by the State of Arizona which helps fund their state parks.  It is chock full of beautiful images of various places in and around the state.  Anyway, I was flipping through the magazine, when I came across this quote:

The butterfly counts not months, but moments
and has time enough.  - Tagore
It inspired me to create this card.

I sometimes use pre-made card bases from Michaels and enhance from there.  This is a 5x7 card base, inked with Weathered Wood Distress ink.  The purple background was made using the Faux Torn Mosaic technique from Splitcoast Stampers.  Found Here  I actually created this quite a while ago and then never used it the way I had intended.  I used Spellbinders Labels 8 to trim it to the size and shape you see.  The quote was printed using my Xyron Design Runner.  I then cut it out using Spellbinders Labels 10.  The butterfly is from Gypsy Wanderings.  The DP was from the bargain bin at Michaels.  I used Star Dust stickles in the cutouts on the butterfly.  The base layer was cut on plain white cardstock.  I don't remember the sizes of any of the cuts. I made this card long before I started this blog, and before I realized such details are important!  That's also the reason for the not so great photo.

If you are so inclined, leave me a comment and let me know what inspires you!


.· ´¨¨)) -:¦:-
          
¸.·´ .·´¨¨))
      ((¸¸.·´  ..·´   -:¦:-
     -:¦:-   ((¸¸.·
 (¨`v´¨)
                        `v´
  Darlene
 

Saturday, October 29, 2011

My Creative Time Design Team Call

Emma at My Creative Time announced her first ever design team call on Sunday, October 23, 2011.  Found Here.  I was excited to hear this, as I've been a fan of her stamps since the first day I stumbled across her blog.  Her requirements were to create a brand new project just for this call.  After lots of thought about whether to create a card, a scrapbook layout, or an altered item, I decided on a card using Emma's All Around Christmas stamps.

It is a swing card, made using Spellbinders Fleur de Lis Squares.  Here it is partially open.
The stamp is Heartfelt Creations Holly Leaves Precut set from the Christmas collection.  I stamped on Bazzil using Memento Ink in black, then embossed with clear embossing powder.  The leaves are cut using the matching Spellbinders dies, and stamped with the matching Heartfelt Creations stamp with Versamark.  They are also embossed with clear embossing powder.  I'm usually not a fan of glitter - bling yes - but glitter, not so much.  However, the holly berries were screaming for something, so I dug through my stash and found some glitter I had been given (thank goodness I had red).  I used my Helmar 450 Quick Dry glue to fill in the stamped areas, sprinkled with glitter - and voilá, pretty holly berries!

Here it is fully open.
I left the inside mostly blank to write a Christmas greeting to the recipient.  The Merry Christmas on the lower right corner is from Emma's All Around Christmas stamp set. The green cardstock is Bazzil.  The patterned paper, ribbon and white cardstock base are all from my Michael's and part of my stash.

Hope you like it!


.· ´¨¨)) -:¦:-
          
¸.·´ .·´¨¨))
      ((¸¸.·´  ..·´   -:¦:-
     -:¦:-   ((¸¸.·
 (¨`v´¨)
                        `v´
  Darlene
 

Tuesday, October 18, 2011

My Creative Time Throwback Thursday Challenge

YEA!!  It's Throwback Thursday at My Creative Time!!!  This time the challenge is to use an "older" Cricut cartridge with a card feature, but the project must be Halloween themed!!!  You can check out the challenge here!
For my card I used Stretch Your Imagination.  I used the card frame feature on page 43.  I used my Gypsy to hide the window before making the cut.  I had lots of thought running through my head for this card.  I first wanted to use the cut with the window and put a black cat in the window, but ultimately did not like how it looked.  While flipping through my paper stash I came across Halloween paper that had an image of a witch on her broomstick in front of the moon.  The card came together from there!


The fun part of this card (IMHO) is the cat!  He is from CTMH SOM.  After cutting him out I colored him with a black embossing marker and added black embossing powder.  His tail was a bit long so I had to cut it to make it fit.  That is not the best part though - the cat is adhered to the card using Helmar Liquid Scrap Dots.  If you've never used these before run to the Helmar site Found here figure out which retailer to use, and buy them!  I saw them on a video and thought they looked cool.  Then I got my hands on them and WOW!!!  The beauty of these is that because they are liquid you can build them, or shape them to give anything dimension.  I used a toothpick to spread the adhesive on the cat's tail so that it too has dimension off the page (and not just the body of the cat).  Could you imagine trying to trim foam tape to fit under the tail?  NIGHTMARE!!!

Other points of interest on the card - the fence is inked with Peeled Paint, Rusty Hinge and Frayed Burlap distress inks. The orange paper and white cardstock are from my stash.  The straw colored patterned paper is from the same stack that I cut the witch from.  I've had it forever, so I can't tell you the manufacturer (the cover is missing).
Hope you like it!!


.· ´¨¨)) -:¦:-
          
¸.·´ .·´¨¨))
      ((¸¸.·´  ..·´   -:¦:-
     -:¦:-   ((¸¸.·
 (¨`v´¨)
                        `v´
  Darlene
 

Friday, October 14, 2011

Link Up For Pink - Project 2

October is Breast Cancer Awareness Month.  From October 1 -  October 14 some very talented ladies will be sharing their stories and/or showcasing some very special projects.
When I posted the layout I made for this special event I said a coworker requested another one and I hoped to have it completed before the link party was over.  I managed to complete the layout in time!!  I apologize in advance as I took a shortcut with the picture and as a result it isn't all that great.


Some design elements might look familiar if you saw the previous layout.  The scroll was repeated by request.  I used the wrinkled distress technique with Spun Sugar and Victorian Velvet.  The font for the team name is Cricut Blackletter, and the ribbon is from Cindy Loo.  I covered it in Glossy Accents to make it shine.  The scales are another Pazzles cut that I purchased from my local scrapbooking store.  The photo frames are something I purchased on Ebay well over a year ago.


Don't forget to visit the Link Up For Pink hostesses:
Celeste - http://touchedbyabutterfly.blogspot.com/
Gaby - http://www.gabycreates.com/
Yolie - http://www.justyolie.com/


.· ´¨¨)) -:¦:-
          
¸.·´ .·´¨¨))
      ((¸¸.·´  ..·´   -:¦:-
     -:¦:-   ((¸¸.·
 (¨`v´¨)
                        `v´
  Darlene